
AUTOMATING EXCEL TO SHAREPOINT DATA TRANSFER AND DEDUPLICATION WITH POWER AUTOMATE FOR 100+ ROWS
- SigiloTech

- Sep 27, 2023
- 3 min read

Are you tired of manually transferringdata from Excel to SharePoint, especially when dealing with more than 100 rows? Do you want to ensure that your SharePointlist remains free of duplicates? Look no further! In this blog post, we will guide you through creating a powerful Power Automate flow that will automatically handle large datasets from Excel, remove duplicates, and keep your SharePoint list updated seamlessly. Let us dive in and simplify your data management tasks!
Step 1: Creating the Excel Spreadsheet
The first step is to create an Excel spreadsheet with all the data you want to transfer to SharePoint. Ensure you give it a suitable name that reflects the content it holds.
Step 2: Populating the Excel Spreadsheet
Add your data to the rows and columns in the Excel spreadsheet. To make the most of the automation, try to add more than 100 rows with values in the respective columns.
Step 3: Convert Data into a Table
Select all the rows in the Excel spreadsheet and click on "Make Table" or use the shortcut CTRL+T. This will convert your data into an Excel table, which is essential for the Power Automate flow.

Here, 111 rows and 2 columns namely, Name and Phone Number are used.

Based on unique identity of values used for column Name we have few duplicates in this table.

Step 4: Create a SharePoint List
Now, head to your SharePoint site. You can either create a new site or use an existing one to house the SharePoint list. The list will store the data from your Excel spreadsheet.
Step 5: Adding Column Names
Create columns in the SharePoint list that match the column names in your Excel spreadsheet. Ensure the column names align perfectly, as this will help with data mapping during the automation.

Step 6: Building the Power Automate Flow
Go to Power Automate and create a new flow. Give it a name that clearly identifies its purpose.
Step 7: Manual Trigger
Start the flow using a manual trigger. This means you will initiate the flow manually whenever you want to transfer the data from Excel to SharePoint.
Step 8: List Rows Present in a Table
Add a new step to your flow and choose "List rows present in a table" as the action. Connect this step to the Excel table you created earlier.

Step 9: Configure Pagination
In the settings of the "List rows present in a table" action, allow pagination and set the threshold to a value that suits your needs. This step is crucial for adding more than 100 rows from Excel to SharePoint.
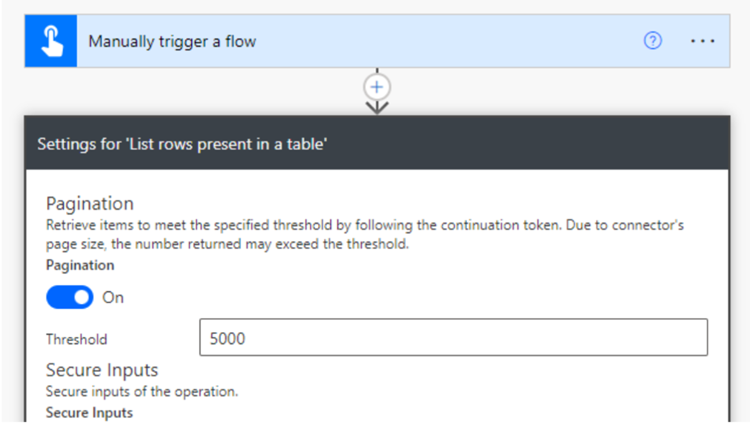
Do not forget to click on the ‘Done’ button.
Step 10: Apply to Each
Add another step and choose "Apply to each" as the action. This step will process each row in the Excel table as separate items.
Step 11: Get Items from SharePoint
Within the "Apply to each" action, add a new action called "Get Items" for SharePoint. Connect it to your SharePoint list.
Step 12: Filter Query
In the "Get Items" action, define a filter query. For instance, you can use a formulalike "Title eq 'Name'" to ensure uniqueness in the SharePoint list based on the 'Title' column with values from the Excel table.

Step 13: Adjust Pagination Settings
Just as before, adjust the pagination settings for the "Get Items" action to accommodate a large number of rows.
Step 14: Add a Condition
After the "Get Items" action and within the "Apply to each" loop, add a condition. This will help you check if the SharePoint list already contains the row you are trying to add.
Step 15: Condition Check
The condition should be: "Length(outputs('Get_items')?['body/value']) is equal to 0". This means if the SharePoint list does not have an item with the same 'Title' as the current row in the loop, it will proceed to add the item.

Step 16: Add to SharePoint
Inside the 'Yes' branch of the condition, add an action to create an item in SharePoint. Connect it to your SharePointlist and map the columns accordingly with the values from the Excel table.


Step 17: Save and Test
Save the flow and manually test it. You should see unique values from the Excel spreadsheet added as new items in your SharePoint list.


Conclusion
Automating the process of transferring data from Excel to SharePoint can save you time, reduce errors, and keep your SharePoint list up-to-date effortlessly. With Power Automate, you can streamline complex tasks and focus on more critical aspects of your work. Happy automating!
For any consultant/support work on O365/ development, contact us or visit our website www.sigilotech.com


Comments